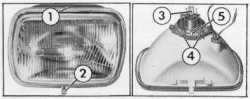
Fig. 46-"SEIMA"
unit
1 - Securing screw
2 - Plastic lug |
3 - Location
of connectors
4 - Securing buckles 5 - Positioning peg |
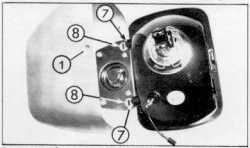
Fig. 47 - "CIBIE"
unit
1 - Screw location
7 - Lugs
8 - White plastic buttons |
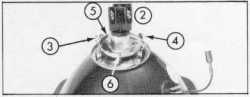
Fig. 48 - "CIBIE"
unit
2 - Connector
3-4 - Holding springs
5 - Bulb flange
6 - Positioning peg |
|
| Main/dipped beam bubls
12V-45/40W |
- Removing the headlamp unit
- Remove "Philips" srew (1) securing the top of the
headlamp unit.
- A white plastic lug (2) is located underneath the reflector.
Push it up as far as possible ant tilt the unit upwards to
remove it completely.
- Replacing the bulb
- Disconnect black plastic connector bearing the supply leads
(location of connector in "3").
- Simultaneously press the two lower buckles (4) of the spring
securing the metallic flange of the bulb to free it.
- Remove defective bulb from reflector.
- The new bulb should be replaced by placing positioning peg
(5) opposite the housing provided for this purpose.
- Replace the securing spring by bringing the two lower buckles
towards one another until they lock.
- Refit the supply connector.
- Fitting the headlamp unit
- Introduce the headlamp unit right into the housing.
- Press the white plastic tab at the bottom of the reflector
and push it in until it locks.
- Re-tighten the "Philips" screw at the top of the
housing.
|
| "CIBIE"
unit |
Fig.
47 and 48 |
- Removing the headlamp: Unscrew screw
(1) and tilt the headlamp unit forward.
- Replacing the bulb
- Disconnect plastic connector (2) bearing the supply leads.
- Swing springs (3 and 4) which hold bulb flange (5) by 9090°
- Change the faulty bulb and fit the flange by placing the
positioning peg opposite housing (6) provided for this purpose.
- Clip springs (3) and (4) over, and reconnect the connector
(2).
- Fitting the headlamp
Position lugs (7) opposite white plastic buttons (8). Pivot the
unit and screw into the housing.
- We recommend that you have your
headlamp beam setting checked by a specialist every time a bulb
is changed.
|
|