The
motor wants to be under pressure
If the
motor doesn't run proper any more it's time to do the points. If this
doesn't help to solve the problem you'd better adjust the valves.
Usually it's the valves if the motor farts and spits after starting.
With a little skill it's no problem to properly adjust the valves
yourself. This must be done to a cold motor. So let it cool down and
take your time to take off the fenders. Now you can reach the rocker
caps. Before taking them off look for 2 empty cans to collect the oil.
It should be large and flat enough to fit under the cylinder head and
can be placed on the chassis. Both sides together hold about 0.25 l of
oil.
When the caps are in position take off the nut on the cap with a 12
mm spanner. Usually the cap sticks with its seal on the head. If the
person who did the valves last time has put some glue or liquid
sealant on the sealing it can be hard to get the cap off. To use glue
or sealant is not necessary but unfortunately many people do so.
Assumed the cap is ok it doesn't need liquid seal to hold the gasket
on the cap.
If the cap sticks please do not try to use a puller or a screwdriver
as a lever on the edges! This will destroy the cap. Better use a
rubber hammer instead to beat carefully on the cap.
After both caps are off you can start to adjust the valves. The
valves are driven from the camshaft via the pushrods. When the
camshaft pushes the pushrods up what makes the rocker arm to push the
valve down to open it up.
In the relaxed position must be a play of 0.2 mm between the rocker
arm and the valve guide. This play has to be adjusted. The reason for
this play is the different extension of the different materials under
heat. For the adjustment the camshaft must be in the correct position.
There are 3 different ways in which position to adjust what valve.
Method 1 (recommended by Citroën) and method 2 are well known for
4 or more cylinder engines. Mechanics learn those method(s) so they
don't need to learn anything new for each motor. But both methods are
relatively critical. And also the camshaft of the 2CV seems not to be
made precise enough (like many other parts on those cars as well). So
for the little 2 cylinder motor of the 2CV the 3rd method works best.
But I want to tell you about all 3 ways.
Method 1: (opposite valves)
The motor must be turned until one valve on one side has completely
opened. Now adjust the same valve on the other cylinder. This
procedure must be done for each valve.
Method 2: (same side)
One valve has opened completely; the other valve on the same side has
to be adjusted. This procedure must be done for each valve as well.
Method 3: (in balance)
On one side both valves must be in the same position. The outlet
valve closes and the intake valve is just beginning to open up. When
both valves are in the same height, adjust both valves on the other
cylinder.
I think that that 3rd method is the safest and easiest one. On the
first look it seems to be more complicated to find the position but if
you know how the 4stroke engine works it's really simple.
First the theory:
On one cylinder the outlet valve is open and the piston moves up.
This cylinder is doing the push out stroke. The burned gas is pushed
out. Just before the piston reaches the upper dead center the outlet
valve starts to close. At the same time the intake valve starts to
open. While the piston moves down it will suck in fresh mixture.
Exactly at the upper dead center both valves are in balance. In this
moment the other cylinder has it's working stroke. Logically both
valves must be completely closed there. This position is a far as
possible away from the next cam on the camshaft. After one more turn
of the crankshaft the next valve starts moving again.
To find the right position for the adjustment you may use the mark on
the flywheel what is there to adjust the ignition. The ignition moment
is 8° before the upper dead center. To get the crankshaft and
also the camshaft into the correct position you need to turn the
flywheel a bit more than 2 teeth after this mark. Each tooth means a
bit more than 3°. So it is very easy to find the correct position
for the camshaft.
How to do it:
To turn the crankshaft use the 14 mm tool you use to take off the
vent. When the crankshaft is in the correct position you can check the
play of the valves. The play is correct when the 0.2 mm blade of the
feeler gauge just fits between the rocker arm and the end of the
valve. If you release the feeler blade it must not fall down.
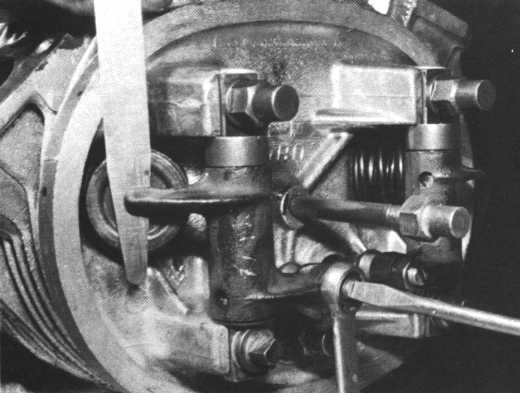
Picture 1
adjustment on the cylinder head
To
adjust the play, loosen the locking nut of the adjustment bolt using a
10 mm ring spanner. Now adjust the distance of the bolt with a
screwdriver so the feeler gauge blade can just be pulled through
without any force. Try to hold the screwdriver firmly in position when
you tighten the locking nut. But mostly the adjustment bolt will be
turned a little bit when you tighten the nut. To compensate this, turn
the adjustment bolt about ¼ turn left after the adjustment and
before tightening. This is about the distance the bolt will be turned
until it's tight. Now check the adjustment and redo it if necessary.
After adjusting all valves clean the cylinder heads and rocker caps
(don't forget the inner sill of the cap where the new seal will be
sitting) and use NEW seals. Put the new seal into the cap and hold it
in place on both sides with one finger while putting the cap onto the
head. So the seal should be in place without using glue or liquid
sealant.
To tighten the nut holding the rocker cap I like to use a 12 mm ring
spanner. The nut must not be tightened too much or you will destroy
the rocker cap! If it is pressed too hard against the head with the
nut in the middle the sill will bend up and it will leak oil. Once
this happens the rocker cap is destroyed. So be careful!
Always handle the spanner very sensitive. I hold it as close to the
nut as possible. So the lever is very short and the risk to tighten it
too much is less. To check if it's oil tight I put some cleaning paper
on the chassis under the cylinder head and run the engine for a few
minutes. If it's leaking oil I tighten the nut a bit more. Before the
next try clean up the cap from the bottom. When both sides are tight
the job is done.
A few more words about the play: If it happens more often that the
outlet valve has no play, the valves are gone. We discovered this
effect a few times already. At least in one case this effect was
caused by bad gas. The whole cylinder head was covered with a thick
crust of gray "sediments". Also the spark plug was messed up
with this gray stuff. This material also sat on the valve seat. In the
outlet stroke the valve heats up. Because of this crust the valve
can't transfer the heat to its heat sink - the cylinder head. So the
valve starts to glow. Since the valves were heat treated to harden
them, this hardness will go when the valve gets too hot. The valve
seat is still hard, so the valve will wear out on its seat. This gives
you less play. After some time the motor refuses to start, since it
has almost no compression left. When you adjust the valves it will run
great again but only for a limited time. With any adjustment the bolt
comes out a little further until there is nothing left to adjust. In
this case the valves have to be replaced. |