|
Front
Disc Brakes
First
a word of warning: When you work on the brakes you MUST know what you
are doing. Accurate, reliable and quality work is required. Your or
somebody else's life may depend on your work.
Beware: The 2CVs with disc
brake system need only the green LHM as brake fluid. If only a little
quantity of the standard DOT brake fluid is added to the system, the
entire brake system is ruined - a partial or a total failure of the
brakes is then only a matter of time. Even experienced mechanics don't
know about this. Read
the article about LHM vs. DOT and let your mechanic know!
When you work on a 2CV with disc brakes, always check for the
presence of DOT. It is easy to determine if there is DOT in the
system. LHM and DOT don't mix, like oil and water. If you can see a
separation line between two fluids in the reservoir, chances are very
high that you look into a costly replacement of the entire brake
system. When you drain the fluid from the system you will see the two
separate fluids. The dirty brown fluid is the old DOT, the dirty green
stuff is the old LHM. The black particles floating between the LHM and
DOT are dissolved rubber from the O-rings and seals of the brake
system.
If you have only one brownish fluid in the system, take a sample and
mix it with fresh LHM. If it separates after some seconds - bad luck,
if it remains mixed you have very old and dirty LHM.
Before
you can start the work you have to perform certain checks:
The brake pads need replacement when the gap between the backing
plate of the brake pads and the rotor is less than 3mm (0.1181 inch)
Check if the rotors and calipers are not oily. If you discover oil,
you must find and fix the oil leak first. Once the brake pads are oily
they must be replaced. Even if the pads appear to be dry again, the
oil still sits soaked in the pad material, only waiting to steam out
between the rotor and the pad once it gets really hot.
Also the rotors need to be in a decent shape. The disc must have at
least 5mm (0.1969 inch) at the thinnest spot.
If you discover that the brake pads are worn uneven and there was no
oil on the rotors, calipers or immediate surroundings, double check if
there was DOT in the brake fluid. Dig into the mechanical history of
this car. Which repairs were done over the past years, who did it, was
the brake system involved anyhow? Sometimes the owner is not even
aware that work was done on the brakes. I had a few cases where i.e.
the transmission was replaced. The mechanic mounted the original front
brakes onto the new transmission, bled the brakes - and of course
filled up with DOT!
Check if the emergency brake pads are worn. You can't see them but it
is simple to determine if the pads need to be replaced. When you
adjust the emergency brake and the cam can be turned in a full circle,
the pads need to be replaced.
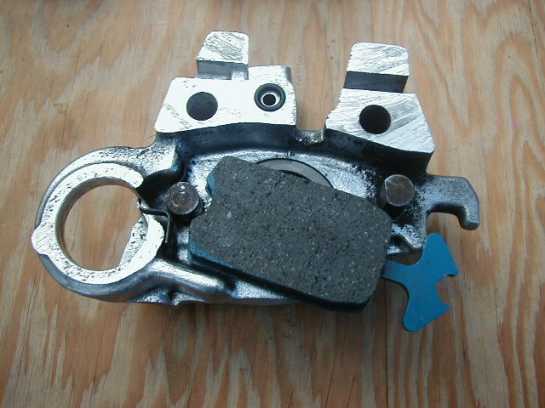
How
to replace the brake pads
This job is very easy if you do only one pad at a time. Use a big
screwdriver and lever the rear end of the brake pad base away from the
rotor. Use caution not to damage the rotor with the tool. Once the
brake pad is pushed away from the disc, use the screwdriver in the
opening of the caliper. Right in the middle of the caliper you can see
the rotor and the brake pads. Carefully push the brake pad away from
the rotor using the screwdriver as a lever. The brake pad must push
the piston in the caliper all the way back. This must work nice and
smoothly. If you discover problems pushing the piston back, you need a
pair of rebuilt calipers. There are usually two reasons for the
pistons to seize in. One possible reason is the wrong brake fluid. DOT
works dissolving the on O-rings. In this case you can still operate
the brakes, the immense pressure from the master brake cylinder pushes
the pistons out, but when you try to push them back - no way. Anyway,
like mentioned earlier, in this case you need a complete new brake
system.
If you are lucky only the calipers are worn.
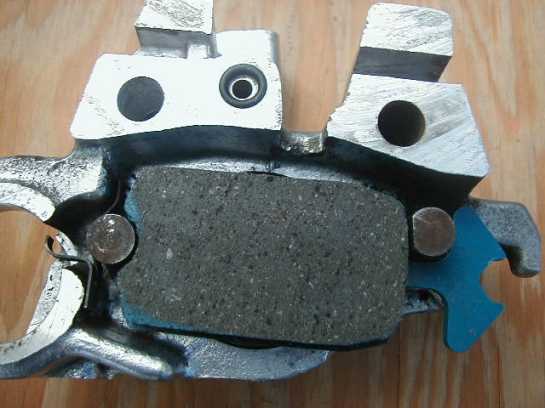
But now back to the replacement of the brake pad. Once the piston was
pushed back completely, you can take out the brake pad. Use the big
screwdriver to push back the wire that holds the pad in place, but
don't bend the wire! To pull the wire back, you need to push the top
part of the wire down to release it from the caliper.
Once the wire is out of the way the brake pad will mostly already
fall out of the caliper. Catch the pad before it falls into the
cooling shroud around the bottom of the rotor. Then insert the new
brake pad. Push the front end into the caliper in a 45° angle.
Once the pad engages into the front attachment, just lift the pad up
until it engages into the rear-locking bolt. Hold the pad in this
position and snap the wire back in the rear end of the pad to hold it
in place. Easy - wasn't it?
How to insert the new brake pad
Brake pad in the engaged position
Now you repeat this
procedure on the remaining three pads. When you are done replacing the
pads, don't forget to pump a few strokes on the brake pedal. The
pistons need to be pushed out onto the new pads. If you forget to do
this and drive the car right away, you may experience a nasty
surprise! (I know what I'm talking about; 've been there - done that).
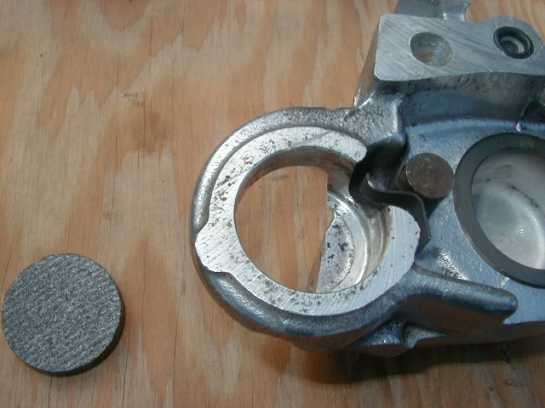
Replacing the emergency brake pads
Undo all 9mm bolts holding the 4 brake levers. Pull the handbrake
cables with the levers out of the way. Watch out on the passenger side
- avoid the lever and cable touching the live wire on the starter
motor right above. Now comes the tricky part: Get the old pads out of
the caliper. I use an old kitchen knife. The blade is slim enough to
go between the caliper and the rotor. It is flexible enough to be bent
onto the emergency brake pad. With this it is easy to push the pads
out of the caliper. When you insert the new pads make sure that the
metal base faces away from the rotor! (No kidding - I know a guy who
did this wrong!) Watch out for the little steel spring in the caliper.
It has to hold the pad in position and keep it from vibrating. If you
push the pad in wrong, this spring may be pushed onto the rotor. When
all four pads were put in place, check if they sit parallel to the
rotor. If they toe out to the back, very likely the spring isn't in
place.
Note the little spring
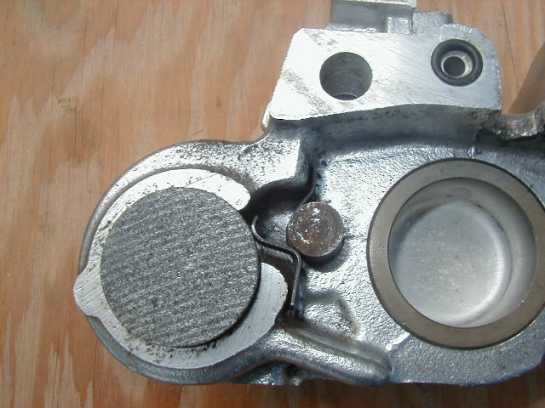
Correct placed emergency brake pad
Before you mount the
lever assembly, take the cams out of the leavers and clean the
surfaces between the lever and the cam. Brake cleaner is great to do
this. To mount the levers, it is easier to do it with the cams still
out of the leavers. Just put both levers of one caliper back in place.
Then screw the bolt with the cam in but don't pull it tight, you need
some play to insert the cam into the lever. Attention: Don't tighten
the bolt to push the cam into the lever as this may destroy cam and/or
lever when they are not proper aligned. Push the cam in only by hand.
Once the cam is all the way in its position you may tighten the bolt.
When the bolt is tight the cam and the lever are in the right position
for the adjustment. Open the bolt enough that you can turn the cam by
hand. Repeat this procedure on all four cams.
To adjust the emergency brakes you need to lift both front wheels off
the ground. (Adjusting one side at a time is possible but it takes
longer and the result is less accurate).
Now turn all cams in the direction that the lever pushes onto the
brake pads when the cam is turned downward. Every lever should now
push onto its pad. Pull the handbrake handle a few times firmly to
make sure that the brake pads are pushed all the way in onto the
rotor. Open the 7mm nuts on the adjustment rods on the top of the
levers check if the handbrake handle is released and adjust the rod
into a position where both levers almost touch the limiters on the
caliper. This way you have later the maximal possible movement for the
levers. Now the whole assembly is ready for the adjustment.
Turn the cams a little bit away from the rotor to release the pads.
Start adjusting on the inside cam. Turn the cam with a fat 24mm ring
spanner downwards until the brake pad starts pushing onto the rotor.
You can feel this easily when you turn the corresponding wheel. Now
tighten the 14mm bolt. Just before the bolt is tight, open the cam
just enough to make sure that the brake pad doesn't wear on the rotor
anymore. When the inside cam is adjusted satisfactory, continue on the
outside cam.
The next step is to synchronize both sides to retard even. Pull the
handbrake out three notches. Both front wheels should turn
significantly harder but still can be moved by hand. If you feel that
the wheels are retarded different, adjust the rods between the levers
to a position where both wheels retard even. Release the handle again
to check if both front wheels can be turned again without the brakes
still rubbing on the rotors.
When the brakes work even, pull the handle out 5 notches. At this
position it should not be possible to turn the front wheels by hand
anymore.
Finally tighten the two 7mm nuts on the adjustment rods and lower the
front of the car down onto the ground.
Replacing worn out rotors without replacing the
calipers
If the rotors need to be replaced it is also necessary to install new
brake pads and emergency brake pads, since the old pads match the worn
out surface of the rotor. Using the old rounded pads on a new and flat
rotor will result in uneven retarding!
To get the rotors out you have to take off the calipers first. If you
like to avoid bleeding the brakes after finishing the job, you can try
to keep the caliper parts tight together at all time. First take out
the old brake pads and handbrake pads. Open the rear main bolt that
hold the caliper a little and tighten it again but less than it was
before. The bolt must be tight enough to hold both parts of the
caliper firmly together but loose enough to allow you to tilt the
whole caliper upwards. Now undo the front bolt and pull it just out of
the transmission. The tip of the bolt should still be in the steel
spacer between the caliper and the transmission. Now lift the front of
the caliper high enough that the bolt comes high enough to put a 10mm
nut onto the bolt. Pull the front bolt tight against the nut and undo
the rear bolt. Pull the caliper away from the rotor and secure the
rear bolt with another nut. Pulling the caliper away make sure not to
bend or damage the brake line.
As the next step you have to undo the drive shaft. Use a slim 14mm
socket to undo the nuts and bolts holding the drive shaft. Open the
front holder of the air duct on the bottom of the rotor. Now pull the
old rotor out and install the new rotor. Make sure that the new rotor
was thoroughly cleaned with brake cleaner since the new parts wear oil
or wax rust protection.
When the new rotor is in place, mount the drive shaft again. Make
sure all nuts and bolts are really tight. Don't forget to remount the
air duct. To install the caliper, start with the rear bolt. Undo the
nut and mount the rear bolt back into the transmission, have the steel
spacer in place. Tighten the bolt only enough that you can still tilt
the caliper assembly down. Now undo the nut from the front bolt and
push the whole caliper down. While pushing the caliper down, hold the
spacer in place with the tip of the bolt. When the caliper, the spacer
and the transmission are proper aligned, tighten the bolt. Don't
forget to tighten the rear bolt when finished on the front one. If you
did it right, not a drop of LHM leaked out and no air entered the
system. If air managed to get in, you have to bleed the brakes the old
fashioned way.
Finally install the new brake pads and adjust the emergency brake.
|